Preventing Roof Leaks After Solar Panel Installation
· R&C Roofing Contractors
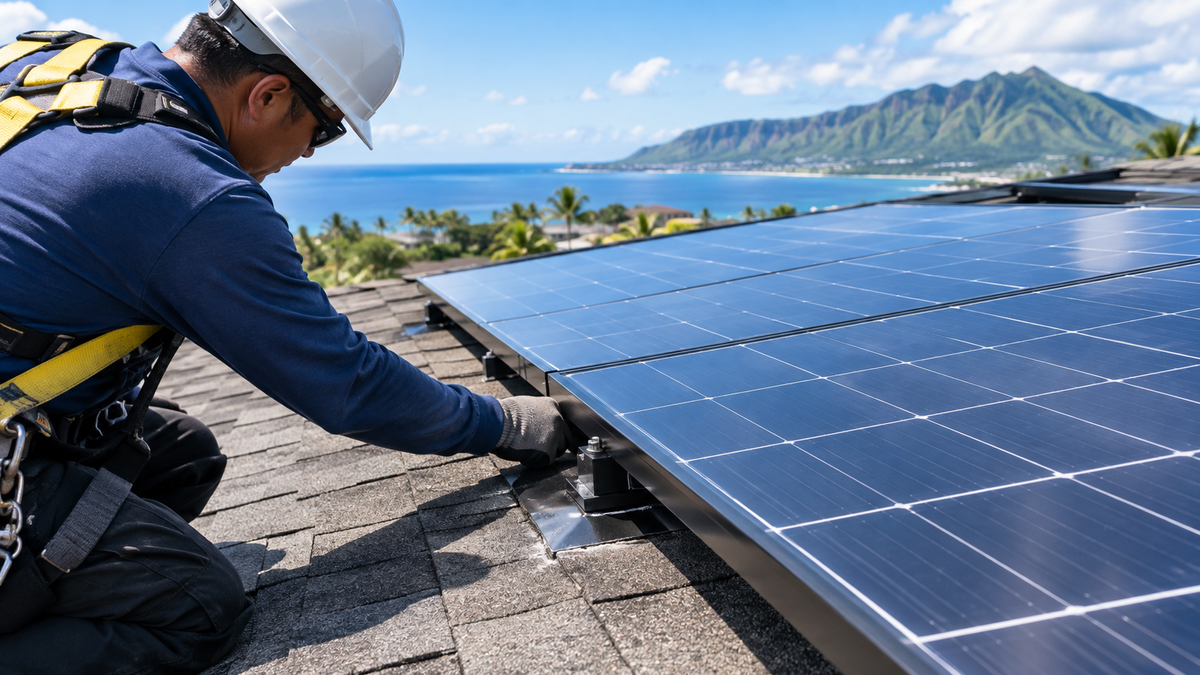
Solar arrays are common on Oahu homes. They reduce energy costs and make good use of the island’s abundant sunlight. Yet every panel mount that penetrates the roof creates a potential path for water if the detailing is incomplete.
The panels themselves rarely cause leaks. The penetrations do. When lag bolts or mounting feet pass through the shingles and into the roof deck, water can follow those openings during heavy rain or wind-driven showers unless the work is flashed correctly and integrated with the existing roof system.
This guide explains the practical steps that keep a solar installation watertight under Oahu conditions. It focuses on penetration flashing, bracket placement, and coordination between the solar contractor and the roofing system so the roof continues to perform its primary job: keeping water out.
Why Penetrations Matter More on Oahu
Oahu roofs face constant UV exposure, salt air, and frequent moisture. These factors degrade sealants faster than in cooler climates and place extra stress on any metal component. A sealant-only approach that might hold for a few years on the mainland often fails sooner here.
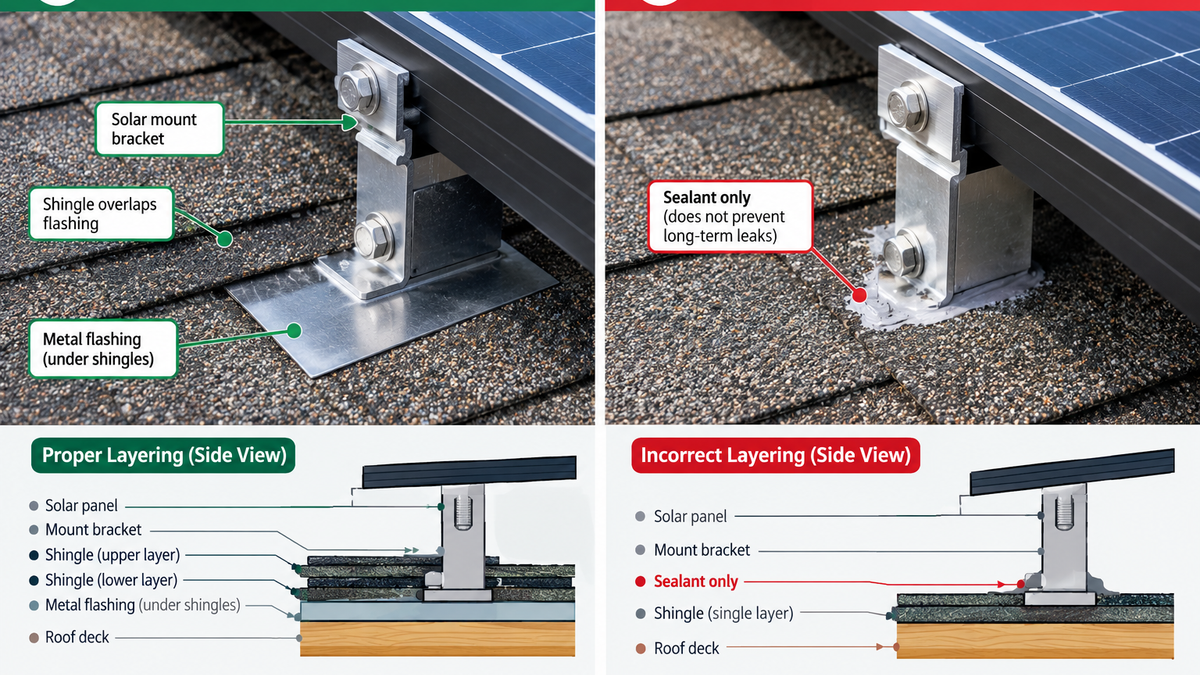
Building codes require that roof penetrations, including those for photovoltaic systems, be flashed in a manner that prevents moisture entry. Sealant alone does not meet that standard. Metal flashing that integrates with the shingle courses remains the primary defense.
A roof already showing age or existing flashing issues will not improve when dozens of new penetrations are added. Evaluating the roof before solar work begins is the single most effective way to avoid later problems.
The Core Elements of Watertight Solar Mounts
Proper Penetration Flashing
Every lag bolt that enters the roof deck needs its own metal flashing. The flashing is a formed metal plate, typically aluminum for corrosion resistance in coastal air. It is installed so the upper edge tucks under the shingle course above the penetration and the lower edge sits over the course below. Water flowing down the roof therefore travels over the metal rather than under it or into the bolt hole.
Key details that matter:
- The flashing must be wide enough to cover the penetration and adjacent shingle joints (industry guidance often calls for a minimum of nine inches on asphalt shingles).
- It must be layered in the same water-shedding order as the surrounding roof.
- A high-quality, UV-stable roofing sealant is used in the pilot hole and as a secondary barrier under the flashing, not as the sole defense.
- The lag bolt must reach structural framing (rafter or truss), not just the sheathing. Bolts that only bite plywood or OSB can loosen under wind load and thermal cycling.
Bracket Footings and Attachment Points
Mounting brackets transfer both the weight of the array and the uplift forces from trade winds into the roof structure. Correct placement requires locating the rafters accurately, usually confirmed from the attic side or with careful probing. Over-tightening the fasteners can crush the shingle or warp the flashing, creating a depression that collects water.
On standing-seam metal roofs, clamp systems that attach to the seams without penetrating the panels are preferred when the roof profile allows it. These systems avoid new holes entirely and preserve the integrity of the metal surface.
Coordination Between Solar and Roof Work
The best outcome occurs when the roof condition is assessed before the solar design is finalized. If the existing roof has fewer than ten to fifteen years of remaining life, or if it already shows widespread granule loss, soft decking, or failed flashing, installing a twenty-five-year solar system on top of it creates a future conflict. Removing and reinstalling panels later adds cost and complexity.
When a new roof is planned around the same time as solar, the ideal sequence is to complete the roof first, then install the array with new flashings designed for the fresh surface. If the solar system is already in place and the roof needs work, the panels must be safely detached by qualified personnel, the roof repaired or replaced, and the array reinstalled with new flashings.
Common Failure Points and How to Avoid Them
| Failure Mode | Typical Cause | Prevention Step |
|---|---|---|
| Leak at bolt hole | Sealant-only installation or missing metal flashing | Require metal flashing integrated into the shingle courses at every penetration |
| Loosened mounts | Lag bolts into sheathing only, not structural framing | Confirm every fastener reaches a rafter or truss |
| Cracked or crushed shingles | Over-torqued fasteners or poor walking practices during install | Use correct torque and protect the surrounding roof surface |
| Accelerated corrosion | Non-marine-grade metal in coastal locations | Specify corrosion-resistant aluminum or coated components |
| Water intrusion under array | Pre-existing roof defects left unaddressed | Perform a full roof inspection before solar work begins |
The Role of a Professional Roof Inspection
A solar contractor focuses on the electrical and structural performance of the array. A roofing contractor focuses on the long-term waterproofing of the deck. Both perspectives are useful. R&C Roofing provides HAAG Certified inspections that evaluate the existing roof condition, document any pre-existing issues, and identify whether the surface is ready to receive penetrations.
The inspection looks at granule coverage, flashing integrity, underlayment condition, and deck soundness. Findings are presented clearly so the homeowner can decide whether localized repair, full replacement, or simple monitoring is the appropriate path before solar mounts are added.
If a leak appears after installation, the same diagnostic process identifies whether the source is a failed solar penetration, an unrelated roof defect, or a combination of both. R&C documents visible conditions and can provide contractor-side information if an insurance review becomes necessary. The company does not act as a public adjuster or negotiate claim outcomes.
Inspections and estimates remain free. Written reports for records or insurance purposes are available at a quoted fee. Learn more about the inspection process on the roof inspections page and about claims documentation on the claims support page.
Relevant Services for Homes with Solar Arrays
R&C Roofing supports Oahu homeowners at every stage of the solar-and-roof relationship:
- Pre-solar roof inspections that establish the current condition of the roofing system
- Targeted roof repair of damaged flashing or localized deck issues before or after panel installation
- Full residential roof replacement coordinated around existing solar arrays when the roof has reached the end of its service life
- Gutter systems that manage the additional runoff patterns created by panel arrays
Every recommendation begins with the documented condition of the roof rather than a sales target. The goal is to keep the roof performing its primary function for as long as the materials allow.
Frequently Asked Questions
Can solar panels be installed without any roof penetrations?
On standing-seam metal roofs, clamp systems can often attach to the seams without drilling. On asphalt shingle or tile roofs, penetrations are typically required for structural attachment. Those penetrations must still be flashed correctly.
How long should solar flashing last?
Quality metal flashing installed to proper detailing should last the life of the solar system, provided the surrounding roof remains sound and the components are corrosion-resistant for coastal exposure.
What should I ask my solar installer about waterproofing?
Request confirmation that every penetration will receive individual metal flashing integrated into the shingle courses, not sealant alone. Ask for photos of completed flashings before the panels are placed over them.
Does adding solar void a roof warranty?
Some manufacturers restrict or void coverage if unauthorized penetrations are made. Confirm the warranty terms and ensure the installation method is compatible with the roof product.
What if a leak appears under the panels?
Do not attempt to walk the array yourself. Contact a licensed roofing contractor to evaluate the penetrations and surrounding roof condition. Early diagnosis prevents secondary damage to the deck and interior.
Protect the Roof That Supports Your Solar Investment
A solar array is a long-term asset only if the roof beneath it stays watertight. Proper flashing, correct structural attachment, and an honest assessment of the existing roof condition are the practical steps that prevent most post-installation leaks.
R&C Roofing evaluates Oahu roofs with HAAG Certified expertise and local knowledge of coastal salt air, windward moisture, and leeward UV stress. The process begins with a free inspection and estimate so you understand the actual condition of the roof before any new penetrations are added or any existing ones are investigated.
Call (808) 888-2524 or schedule through the website. Clear documentation of the roof’s condition gives you the information needed to protect both the solar system and the home it sits on.